
I call this series Botanica Erotica. These are the small 4” x 4” squares.
Well, the molds have been made for some time now but what with all the g'kid visits and the couple of jobs this summer I haven't had time to finish them. Over the past three days I have filled all three molds. Not completely though. The glass in them is less than half the glass needed but we still have to make the reservoirs to hold the extra frit. The larger flower squares I modeled last fall still have yet to have their molds made. Although I made those models first, I decided to cast the three small ones first to work out my ideas, see if my plan for filling the molds, layering the colors would work out.
I don't know when they will get cast. Although the power has not cut off since that one week when it went off three times, we need to get more plaster and silica to make the reservoir part of the molds and we're waiting til later this week to head into the city.
I've started taking lots of pictures of the process of model making and filling the mold. One of the things I'm thinking about doing to relieve our income problems is write a book about our work and process. I've had several people suggest that I ought to do it. I doubt that any of the pictures I've been taking would be usable but at least it makes me think about all the steps and how I would write about what I do. I don't even know where to start so I'm going to look over books other glass artists have written about their work and process and see if I can at least work up an outline. It's a long term solution to right now income woes but I think it would bear fruit eventually.
So anyway, here's how one of the flower squares went:

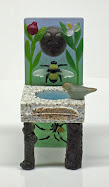
The mold with the first color in place. This was actually three colors. First I put in a very pale yellow, backed it up with a light amber, and eventually added a little bit of medium amber (but not in this pic). You can see the picture above the mold that inspired this piece.

The next layer of color was a mix of translucent white and clear with black powder and a tiny bit of white stringer in the tips (which you can't see, covered with the white as it is).

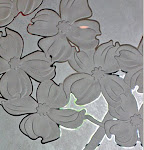
Next I layered in the colors in the petals. I used three different mixes of lt. pink, dk. pink and lt. lavender with a sprinkling of fushia.

All the petals have been filled in.

Next I filled in the background with a lt. gray.

Finally I put in a layer of clear and then filled it with a courser size of clear. If this looks like a different mold, that's cause it is. I forgot to take a picture of this stage with the first one.
Once the reservoir is made and stacked on top, I will add a layer of white, more clear and then finish with white or maybe I'll do all white. The finished block should be 1” - 1 1/2” thick at it's thickest point. All the colors except for the white are transparent. Once fired, some of the colors will intensify and with all the little air bubbles that are trapped inside, the transparent colors will appear more translucent.


I think you would do really well with a book. You explained that quite well. and pictures, pictures, pictures!
ReplyDeleteA textbook with photographs and diagrams is an excellent idea.
ReplyDeleteIt always amazes me how much hard and complicated graft goes into one of your pieces.
Pity I can't afford you.
What a cool process.
ReplyDeleteRe: a book. I wonder if it would be profitable to do an online publication, the kind where a customer pays "x" amount of $$ and is given access to specific instructions for a project.
Liking this one Ellen! Great idea.
ReplyDeleteNeat. And I like eloh's idea - you should write a book - very well explained and photographed.
ReplyDeleteCan't wait to see the finished product.
Can you reuse those molds or do you have to break them to get the item out?
Good question Skippy. They are one use molds. After firing they are extremely soft and full of hairline cracks. We make them this way because of the undercuts in the pieces. Breaking the mold away is the only way to get the piece out without it breaking.
ReplyDeleteSuch a process. I had no idea it was this involved. A book sounds like a fantastic idea!
ReplyDeleteoh ellen - so cool! i'm really looking forward to seeing the "birth". steven
ReplyDeleteI kind of like how it looks with just the colored glass bits - sort of soft & pretty.
ReplyDeleteA book sounds fabulous!
interesting. can't wait to see what comes out!
ReplyDeletebeautiful work
ReplyDeleteyou must have an incredible amount of patience and an eye for detail
I admire that
Another glass book? Why not? And if you do an e-book, why not embed a video in the book?
ReplyDeleteAt any rate, at few other thoughts. Get some pictures of your hands and tools in there, so they can see exactly how you are packing the mold (that of course would be better witha video snippet). Tell them how long it took. Mention it would help to get into a calm and reflective frame of mind when doing it. Explain not only the how, but the why, and distinguish between economy of process learned through dint of experience, versus personal choice. (For example, why do you not use a flower pot for your reservoir, versus your plaster/silica constructed mold).
Also, technical stuff is important. I know its boring, but its necessary.
If my write up on investment materials (which I plan on recsuing from warmglass and publishing on my blog) can in any way help, feel free to grab from it.
I know you could write a great book about it. What a cool idea.
ReplyDeleteThe process is fascinating. What you do can only be understood with much, much trial and error, over the experiences of many years. I love the rich patina.
ReplyDeleteOh I love the step by step pics!! Fabulous! And I would love to see these in person!! The color layering sounds so cool!! The texture has to be amazing!!
ReplyDeleteThanks for sharing
Hugs
SueAnn
Ellen, your work is so beautiful!
ReplyDeleteWhat a fascinating process! That is a lot work and a lot of talent in each piece.
ReplyDelete