6 of 12 panels
After three very long days, the panels are done. Backgrounds finished and jewels glued on. I still need to trim off the excess adhesive but it won’t harden fully for another day or so. I’ll do that on Tuesday and then we will deliver the panels to the art consultant. Yay!
If you are just getting here these are the posts about this job that precede this one:
I had another question about the sandblasting.
Cynthia Morgan (who does some really nice cast and pate de verre glass work herself) asked...
the sandblasting in some of the images looks shaded (around the tree trunks, for example). Do you sandblast evenly across the entire glass surface, or do you actually go a bit deeper and shade/contour some areas? Or blend them in with previous pulled-off stencil layers so that you get a smooth contour? The short answer is...yes. There are three basic techniques; carving, shading or airbrush and etching (and these are my definitions/labels).
carving - the longer you point the sandblaster at the glass in one spot, the more the glass is ground away, abraded away, and the deeper the spot gets until eventually you would have a hole in the glass. The stencil controls the shape of this ‘hole’ and the distance, pressure, blasting grit, and time control the depth. Think engraved glassware on an architectural scale. There is a third dimension but it’s only about 1/8” - 3/16” deep. The illusion of greater depth is the result of shadows on the edges and shading.
shading or airbrush - this is a surface technique using low pressure and (ideally) less sharp grit to achieve a tone that can go from a totally etched surface to a barely dusted surface. In this way, by manipulating the various shades, great illusory depth or distance can be achieved.
etching - another surface technique using high pressure and sharp grit where it’s either completely etched or it’s clear.
So to answer your question about these pieces, yes the leaves and branches are deeper and contoured and blended and shaded. No airbrushing really, just shading large areas and sometimes it’s a subtle difference.

And then we replace it with another, clear stencil material.
This time I freehand a cut around the etched and carved areas about 1/16” from the edges of the design.
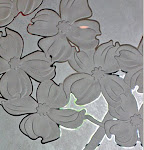
Once the second stencil is cut, I apply a chemical etching cream with a sponge. (out of focus, sorry)
Wait 10 minutes or so and then hose it off. (also out of focus, seems SOMEone has a hard time with this camera)
The few remaining pieces of stencil are removed and the panel is sealed to help prevent fingerprints on the etched surface.


oooooh I want one so much! Your work is incredible.
ReplyDeleteI hope that you do get the pics from the installation, but I can still see how beautiful this is going to be when it is put up.
This is so gorgeous!
ReplyDeleteCongratulations on forging ahead, since this month is a total loss for you, or so you said. You are SO mighty.
Mighty talented, too!
Oh Ellen, darling! That is just breathtaking work. How proud you must be to create that lovely art from concept to completion and know, as you said in an earlier post, that it will more than likely outlive you and your generation. Wow.
ReplyDeleteElizabeth Bradley posted recently about leaving your mark on the world. You, girl, have left many marks in glass. Best of al, you leftl your mark on my heart.
Love you. And congratulations.
♥ Alix
Beautiful, beautiful work. I love seeing the process, the actual creation. And those jewels seem like they will catch the light in a stunning way, reeally drawing the eye.
ReplyDeletePlease can I have some, please can I, Pleeeaaaassseeeee :0) Great work
ReplyDeleteAll I can say is WOW...how gorgeous! I have always admired the glass work but now knowing all that goes into it...even more so!
ReplyDeleteooooooo...just stunning. And I love the jewels, too!
ReplyDeleteBeautiful.
ReplyDeleteAstonishing!
ReplyDeleteWhat Alix said!
ReplyDeleteBeautiful work, and I ought to know! I have sold many glass installations and hired many artists in my day.