
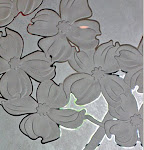
The rough full size drawing
My last post on the Oklahoma Heart Hospital Chapel art glass left off with the intermediate size art work completed. This is generally 1/4 - 1/3 full size. Using dimensions from a field measure, I sent the now detailed intermediate drawings to be enlarged to full size. Once again, I re-drew the enlargements, this time just tracing the them. I have to do this because when you enlarge a pencil line 387%, it’s nearly 1/8” wide.

tracing the enlargement
The full size drawings were completed and then the waiting game began while they decided what to do about my dissatisfaction with the depth of the channel that would hold the art glass. It was not sufficient to adequately hide the edges of the glass. That aesthetically, they would not be happy.
And really, it was a paltry 1/4”. What were they thinking? Eventually, they had the channels re-routed to 1/2”. I finally got my tight dimensions November 5.
I got the tight dimensions from the guy at the cabinet company who measured them. The measurements for the full size drawings came from the designer who went to Oklahoma and measured them. The two sets of measurements for the height of the small panels was off by 1/4”. Man, I hate when that happens. Two sets of measurements both field measured and both different. I used the ones from after they had been rerouted. I still am uneasy about it though. That’s one of the problems when you do work out of town. Unless you make the trip, you have to rely on someone else. I don’t mind making the trip, but most clients don’t want to pay for it.

numbering the diagram
I ordered the glass. While I waited for the glass to arrive, I had two copies of the full size art work made. One becomes the pattern for the stencil and the other becomes the diagram that directs the sandblasting. Once the glass arrives we are single minded into fabrication. Everything else gets put aside til we are done.

the clear glass

The first thing is to cover the clear side of the glass with a thin adhesive plastic that protects it from getting scratched while we work on it.
 Next, the other side of the glass is cleaned and covered with the 8 mil stencil material.

The design is trimmed and applied to the tape covered glass with spray adhesive.

I cut the stencil by ‘tracing’ the design on the paper with a craft knife and a #11 blade, cutting through the paper and the stencil material at the same time.

Once the stencil is cut, the pieces of the pattern are removed in numerical order and marked on the stencil itself.
The glass is now ready to be carved.


Wow! That's amazing stuff. How did you come to learn this wonderful craft?
ReplyDeleteI imagine this work is extremely satisfying/gratifying. Do you enjoy every stage of the work, or is it stressful. And what happens if the glass breaks? That would be my greatest fear... all that work and then, disaster. Have you ever lost a piece?
Thank you, Ellen, for sharing this with us. I am intrigued and can't wait for your next chapter!
I had no idea how this was done...so very interesting! It's like putting a puzzle together although way harder! I would be so afraid of breaking the glass with those small pieces!
ReplyDeleteI always wondered how that is done. Amazing, I do not think I could do that.
ReplyDeleteYou are truly an artist!
ellen i held my breath the whole way through this post. i do that when im painting. it makes for some delciate moments but i love precision and detail and breathing throws that off for me. watching the stages of your work - shown here with such clarity and care - well it was amazing to be right alongside you and somewhat inside your head!!! thanks. steven
ReplyDeleteWhat a wonderfully intricate process you take with your art. It's just this type of careful detail that lends it such beauty.
ReplyDeleteSo many questions. I think I'll answer them in a new post.
ReplyDeleteEllen, thanks for posting the photos and your step-by-step process! Wow! Can't wait to see the finished product. Best regards,
ReplyDeleteOh my! I have to tell you again "You are sooo gifted" and dedicated too. I get tired just reading about the work, but like Alix said I'm sure it is so "satisfying/gratifying" that it is worth it. I sure love looking at your stuff. I can't wait to have little piece of land to build my cottage because honey I'm saving my money for a window!
ReplyDeleteThat is a detailed and difficult process. Beautiful though.
ReplyDeleteThank you for sharing.
I'm loving this series - keep it coming!
ReplyDeleteI love the process—seeing the step by step and the thinking that must go into it to make it work. Thanks for sharing this. I can't wait to see the next steps as you move forward.
ReplyDeleteWonderful! I'll be waiting for your new oost - the one with the answers. I, too, am curious where you learned all this.
ReplyDeleteArtist + engineer + powertool wielder = one amazing chica!
ReplyDeleteWow! You are something. The work you do seems completely overwhelming to me. Your ability to focus and all the physicality of it all - wow and wow and WOW!!
ReplyDeleteOh, I love this entry! It's just fascinating. I'd love to see the finished product.
ReplyDelete)O(
boo