I have been asked some questions in the comments of the posts about this job (previous posts 'working on paper', 'the next step' and 'starting fabrication') none of which I have answered so I thought I would do that now.
Alix asks...
How did you come to learn this wonderful craft?...Beyond watching a friend sandblast a crude stenciled rose on a piece of glass, we are completely self taught. There was no instruction back then and so we just used the ‘trial and error’ method.
Do you enjoy every stage of the work, or is it stressful?...I do and I don’t. Doing the intermediate and full size art work is probably my favorite part. I’d say the most stressful part (aside from deadlines) is the composition and design part. It’s hard to get started sometimes. I wander around a lot at this stage until I finally settle down. The fabrication is just grunt work...cut the stencil, make the diagram, do the sandblasting, in this case cut the stencil again, do the cream etch and finally glue on the jewels. A lot of steps but at that point it’s just technique. I still like that part of it too. I like the drawing part but I also really like the making part.
What happens if the glass breaks?
Have you ever lost a piece?...Well, you know, glass breaks. It is unforgiving. It’s doesn’t bend, it doesn’t absorb. And so, yes, we have lost pieces. I personally have not broken a piece in a very long time. Nor has Marc. But it’s not always in our possession. Usually, if it gets broken, it happens during installation. Twice we have lost a piece from having a suction cup fail. One a nail clipped the edge when the molding was being put in. But what can you do? Getting upset does not solve the problem. You just gotta suck it up and do it over. And I hate doing them over.
steven (didn’t really ask anything) commented about
breathing and holding the breath re precision....I too was in the unselfconscious habit of holding my breath while I worked. I was scolded for this habit over and over so I have tried to learn to incorporate my breath as I work. But sometimes I do breathe out for a very long time.

Now that the stencils are cut, they go through the sandblasting process. Peeling the cut pieces of the stencil off in a sequential order, Marc sandblasts those areas as they become exposed.

Here’s the sandblasting booth.

Marc wears the air supplied helmet hanging by the door so he won’t breathe the dust. The yellow tank on the wall is the filter for the air he breathes. The small blue cylinder on the wall near the floor is a water trap to keep moisture out of the pressure pot (the metal tank with the green hose in the back) which holds the aluminum oxide he blasts with. At the end of that green hose is the nozzle he points at the glass when he turns the system on. It’s run by a large air compressor (not in this picture) and the air is piped in. The square on the back wall is a filter in front of the exhaust fan. The brown stuff all over the floor is the blasting grit.
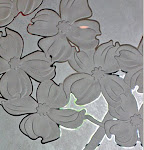
Here are some details from the sandblasting process.


Here’s a little slide show that shows one of the panels from start to finish. You might notice that the first 6 are upside down (that’s right side up to you). He works on them right side up, upside down, sideways, whichever is easiest to get where he needs. Most of this panel was done upside down.
I know that last picture in the slideshow, where all the rest of the tree is etched, it’s hard to see all the detail, but it’s just the photo, the glass all dusty. The detail of the leaves will show up when it is cleaned off and held up to the light.
Now we have to prepare them for the background etching technique.


Wow! I'm not sure which I'm more excited about... learning how you create your amazing etched glass artistry or having my questions answered on your blog.
ReplyDeleteThank you for taking the time to instruct us, Ellen. I'm so in awe of what you and Marc do. It's really inspiring and intriguing. I'm so proud of you both!
I think it looks fantastic. Did you demand that next time Stephen follows orders and asks a question?
ReplyDeleteWhat a true labor of love, it shows in your finished product. I raise my coffee cup to you in recognition of the intricate, beautiful art you create.
ReplyDeleteDarnit, I couldn't see the video for some reason.
ReplyDeleteBut wow...self taught. That's amazing.
)O(
boo
Very interesting ...
ReplyDeleteI love process and technique stuff, and this is fascinating. Thanks! Aside from a couple of trials in friends' coldworking studios, never really done sandblasting. This makes me want to.
ReplyDeleteIf you can stand another question--the sandblasting in some of the images looks shaded (around the tree trunks, for example). Do you sandblast evenly across the entire glass surface, or do you actually go a bit deeper and shade/contour some areas? Or blend them in with previous pulled-off stencil layers so that you get a smooth contour? (Am I making sense?)
This is just amazing, Ellen. I enjoyed learning a bit about the process.
ReplyDeleteVery interesting, Ellen. It takes talent and precision, that's for sure. What beautiful products, however.
ReplyDeleteWow! Reading this and your other posts on your art makes me realize again and again how EASY photography is, how EASY painting is (my other art).
ReplyDeleteYou are mighty and you are a bad ass and you are so facile and talented!! You do all this and still there you are, a tiny little thing.
Bravo!!
You know your craft well and have the heart of a teacher.
ReplyDeleteYou know your craft well and have the heart of a teacher.
ReplyDeleteGlass fascinates me. I love watching people work with it. I can't imagine working in that medium myself. I love reading how you work.
ReplyDeleteI hope to relocate near Sandwich, MA -- they've got a really wonderful glass works there.
this is INCREDIBLE!!!!!!!! and the step by step info is quite informative. You are so talented Ellen.
ReplyDeleteHi Ellen
ReplyDeletethanks for the informative lesson
Happy days
Your blog keeps getting better and better! Your older articles are not as good as newer ones you have a lot more creativity and originality now keep it up!
ReplyDelete