Friday
I intended to get at least two molds filled. I got one done, the
simple bee. It took me a while to get set up, trying to decide where
in the shop, but get set up I did, got my colors out and measured and
my tools and I reached for the gum arabic solution I mix with the dry
frit...and no gum arabic. It was at home in the refrigerator.
When
I went back to get it, it had a big hunk of nasty looking mold
floating in it. Fortunately Marc was on his way into the city so I
called him and he brought me back some new. In the meantime, I used
a very small amount of a different bottle of gum arabic I had left
over from a printing with powder sort of lithography technique class
I took. I'm sure it will be OK. I could have used Karo syrup which
burns out clean. Later, in the middle of measuring out more glass
frit, the battery on my scale died. So off to the store for a new
battery.
On
top of all that, when I opened my notebook I saw that it has been
over a year since the last time I filled a mold and while I hadn't
completely lost my skill set, I was a little rusty.
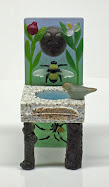
The
bee is very detailed and takes over an hour just to get the frit in
the negative bee space. Here, the frit is flush with the surface.
The colors have to be built up from here because the frit packed into
the negative space contains a lot of air and as the glass melts it
sinks down so to be sure the proper color fills the entire space
after firing, the frit has to be built up at least as high as the
negative space is deep.

Here
I am starting to add in the background/block color, building up the
bee colors as well.

Most
of the frit I use is size 'fine' which is about the same consistency
as sand. Sometimes, I will use powder for really tiny areas like the
toes of the lizard though here I have noodled fine frit into those
toes. I don't usually like using powder because it comes out more chalky looking. And sometimes I will use size 'medium' frit,
which is about the size of minced garlic, for backgrounds but mostly
I use the size 'fine'.
I
did manage to remember to photograph the lizard on the bark
throughout the process. I think I have posted about filling molds
before but it's been a while so here it is again.

the
mold and the colors for the lizard and the acorn

filling
in the lizard

this
chameleon will be changing colors

building
up the frit and filling in the acorn

lizard
and acorn complete

laying
in the color for the bark

bark
color filled in

a
thick layer of size medium clear frit to allow for a soft
illumination from the sides

a
thin layer of white for the very bottom
Now
they are ready to go in the kiln where it will take about three days
to heat up, cast, and cool down.


That is some labor-intensive beauty there!
ReplyDeleteI love this stuff. I really enjoy seeing how all is done.
ReplyDeleteit's just amazing to me...
ReplyDeleteIt all comes back. Sometimes I think it's muscle memory.
ReplyDeleteWow.. such a detailed process. Looking forward to seeing it after it's out of the kiln.
ReplyDeleteSuch a complicated and detailed process. I am sure that you have learned the steps well from previous efforts.
ReplyDeleteYou get to have ALL the fun...
ReplyDeleteI can't stand it - I want to see the end result NOW! :)
ReplyDeleteSO cool! Can't wait to see the final product. I want more opportunities in life to say "frit." It's a great word.
ReplyDeleteI LOVE when you share this kind of posts. It's like you let us in a big secret, and I delight in knowing it. ;-)
ReplyDelete