About a year ago, Houston's first 'glass center' opened. What I mean by that is that there have always been personal stained glass studios or stained glass/fusing studios whose proprietors also taught classes and there are a few private glass blowing studios, one of which offers classes, although this is more of a 'warm' glass community since our climate does not really lend itself to having a furnace running year 'round.
We also have the Houston Center for Contemporary Craft that has an artist-in-residence program and offers workshops, but their kilns are not really suitable for glass and they really don't like how messy glass can be. Lamp workers they are OK with as it is fairly self contained but casting is a messy deal and they really didn't like that.
So when Bob Paterson opened Hot Glass Houston, a resource outlet for Bullseye glass, a company that specializes in facilitating artists using glass as a medium, he not only provided a local resource for the glass many of us use but he also brings in very accomplished guest artists to do workshops in an amazing array of techniques.
And so, this past Monday and Tuesday, I participated in a workshop on transferring imagery to glass in an effort to finally figure out how I want to make the 'pictures' for the memory box.
There are several ways this can be accomplished...fusible decals, emulsion stencils for sandblasting, painting with enamels. This particular workshop taught by Carrie Iverson is a technique she developed from classic printing techniques coming from a printing background as she does. She prints on paper, on fabric and other substrates and she got interested in glass.
In this workshop, we used a traditional lithography printing technique that had been modified slightly for glass. I did take my camera but I did not take a single picture because almost from the moment I picked up the brayer and rolled it in ink, my hands were covered with ink and gum. Basically what we did was this:
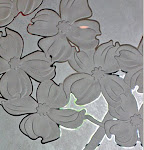
We mixed printer's oil-based ink with a waxy substance and used a roller, a 'brayer', to transfer the ink to a laser print that had been coated with a gum solution first. After enough ink had been transferred to the print (the ink only stuck to the black of the image on the paper), we picked up the paper and flipped it over onto a 6" x 6" piece of glass, ink side down, and burnished it transferring the ink from the paper to the glass. The next step was to sift glass powder onto the still wet ink. Then you fire it and the ink burns off and the glass powder fires in.
My first impression was that this might be the way I wanted to go but then I thought maybe the results wouldn't be crisp enough. The first day we did two pieces in the morning, each on a single layer of glass, one fired to tack fused (you can still feel the texture of the glass powder on the glass), the other to full fuse (feels completely smooth).

black powder tack fused on clear

black powder full fused on white
In the afternoon we did three pieces, each two layers thick and fired to full fuse. There's a whole lot in here about colors of ink, colors of frit, colors of glass, reactives, layering, tones, etc. that I'm not going to go into but here is the result of my first day. I worked with the images provided by the class.


On the way there on the second day, before I had seen these, I was pretty convinced this wasn't going to give me the look I wanted, not crisp enough, or maybe, since this is a reliquary for a memory, that would be better because memories fade, right?
I was pleasantly surprised by the results of the previous day.
That second day we did three more pieces 2 layers thick, all to full fuse. I still didn't have any images of my own to bring in, being as we were at the city house, but several others in the workshop did and they shared around.
I haven't seen my pieces from the second day, that will have to wait til the next time we are in Houston, I'm kind of curious about one of them though. I wondered how it would look on sandblasted, etched, glass so on one of my tiles I used the blast booth to sandblast one of the clear pieces and then 'printed' the image on the sandblasted surface and stacked it on another piece of clear. Might be an interesting technique for the architectural work.
Anyway, I'm intrigued enough to try some on my own.


I love these soft images, sort of old photograph looking sepia. A technique for lots of lovely playing and practicing!? Look forward to seeing day 2 when you get them.
ReplyDeleteGlad you enjoyed the workshop - I too look forward to your second day results.
ReplyDeleteThe workshop sounded really fun. Working with glass is one craft I haven't tried to do yet. I do like the look of this technique tho...it's soft and the fact that it isn't crisp makes it took like an old faded photograph which i think is really cool.
ReplyDeleteIt reminds me a bit of batik - especially the zebra. But I guess that could just be the subject matter.
ReplyDeleteFascinating and hard and complicated work! Always learning!
ReplyDeleteAren't those lovely?
ReplyDeleteAlthough I understand very little of what you are saying I can see how absorbing the class must be for you.
ReplyDeleteI love the zebra.
Is there really still something about your art that you need to learn? If so, wonderful, because only while learning and exploring are we truly alive.
the softness carries a sort of presence but i love crispness on edges also and i'd be wanting to know how to create that sharpness. steven
ReplyDeleteThe zebra one mesmerizes me. It looks as tho' the one on the left is walking off into the morning fog.
ReplyDeleteCool!
oh man. i am in houston now, down the street from hot glass houston, but was unable to come down earlier for the class. I regret not re-arranging my schedule. these are all kinds of beautiful! I need to learn these techniques badly...
ReplyDelete